Sunny Citrus Shortbread Bars

IMG_4026Last August, I was invited to contribute a dessert recipe to Protea Wine’s blog. It was an adaptation of something that had been floating around the Internet for a few weeks, that I’d brought into the office one day to rave reviews. I’d fully intended on posting it here, but then lost track of it…until I just recently stumbled across the image files again.

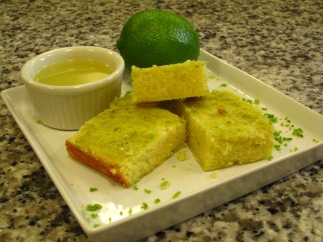
The original recipe called these “lemon brownies;” to my taste, the texture is nowhere near a brownie – much more of a moist shortbread. They’re not overpoweringly sweet and the fruit flavor really shines through. It’s another recipe that works quite well with gluten-free baking mixes – in fact, I like the slightly nutty flavor they give. I’ve used oranges, lemons, and limes in these bars, and while I’ve liked them all, the lime version was the hands-down favorite among my co-workers.
photo 8Bars:
3/4 cup all-purpose flour or gluten-free flour
3/4 cup granulated sugar
1/4 Tsp salt
1/2 cup (1 stick) unsalted butter, softened – or use salted butter and omit additional salt
2 large eggs
2 Tbsp fresh citrus zest
2 Tbsp citrus juice

Glaze:
2 Tbsp citrus juice
4 Tbsp fresh citrus zest
1/2 cup confectioners’ sugar

Directions:
Preheat oven to 350°. Grease an 8×8 inch baking dish with butter and set aside.
Zest and juice two large lemons or oranges (may require 3-4 limes depending on size) and set aside. You’ll have extra juice left over, and in fact the amount of glaze made is more than generous – try using the extra for dipping fruit or ladyfingers!

Cut dry ingredients into butter until thoroughly combined. In a separate bowl, whisk together the eggs, 2 Tbsp zest, and 2 Tbsp juice. Pour into the flour mixture and beat until smooth and creamy.6. baked and cooling

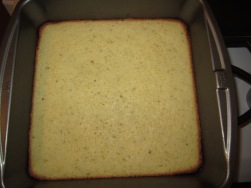
Spread in baking dish and bake for 23-25 minutes or until golden around the edges. Do not overbake, or the bars will dry. Allow to cool completely before glazing.

Sift the powdered sugar and whisk with remaining zest and juice. Spread over the bars and let set before cutting. The bars will be delicate – you can cut them while still warm, but make sure they’re completely cool to the center of the pan before attempting to remove them.

Makes a dozen generously-sized bars.

IMG_4021

A big hat-tip to Protea Wines for the use of some of the images; see the original post at  http://www.proteawinesusa.com/2014/08/wine-and-dessert-pairing/

Adapted from http://www.bestyummyrecipes.com/lemony-lemon-brownies/

Garlic Mushrooms

This past week’s project came about due to a good barter deal. In exchange for some small pieces of armor for our SCA loaner gear, I agreed to can $20 worth of garlic mushrooms (or about 7 pounds at current warehouse-club prices).

The mushroom recipe is loosely based on a crowd favorite at the local Renaissance Faire, where it’s served with a breadstick, a toothpick, and lots of napkins.

  • 1 pound fresh mushrooms, in bite-size pieces
  • 2 cups broth*
  • 2-3 cloves garlic (adjust as desired)
  • 3 TBSP butter**
  • 1 small bay leaf
  • 1 tsp finely chopped fresh thyme, or ½ tsp dry
  • Salt and pepper to taste

Simmer together over low heat, adding water if needed to just cover mushrooms, until cooked through. Chopped onion makes a tasty addition if desired. Makes 4-6 side-dish servings.

*Broth: Beef, chicken, or vegetable broth all work equally well. If using commercial canned stock, I tend to dilute it 50/50 with water.

**Butter: You can cut down the amount of butter used if desired, but I wouldn’t eliminate it entirely since it’s key to developing the depth of flavor. I’ve tried making it with olive oil (my other preferred fat) but it just isn’t the same.

Leftovers (if you have any – a rarity for me!) are quite versatile. Add your favorite thickener, and you have a rich brown gravy; or add sour cream and diced cooked meat or shredded cheese, and toss it with pasta for a quick and hearty meal. Or strain, skim, and use as soup stock. (This weekend’s leftover broth became lentil-wild rice soup.)

The flavors improve with re-heating, which make it an ideal recipe for home canning as well. Use pint jars and process in a pressure canner for 45 minutes at 10 pounds pressure. Figure roughly one pound of fresh white button mushrooms per pint. (In the photo, the light-colored band at the top of the jars is the butter that rises to the top and solidifies.)

Image

Gluten-Free French Tart

gluten-free french pear tarts

I’ve had a lot of success with this recipe; in fact, I find I prefer the gluten-free version of the pastry cream to the original flour-based recipe. The original used apples instead of pears, and no rosewater – so you can see that it’s pretty versatile!

Gluten-Free Pear Tart (adapted from Bistro: The Best of Casual French Cooking by Gerald Hirigoyen)

Tart pastry (see below)

1 cup pastry cream (see below)

3 large pears such as Anjou

2 Tbsp rosewater – optional

2 Tbsp melted butter

1 Tbsp sugar

  • Preheat oven to 375°.
  • Line a 10-inch tart pan with the pastry dough; trim and return to refrigerator. Peel and core the pears and slice thinly into a shallow dish; sprinkle with rosewater and set aside.
  • Spread pastry cream to 1/8” thickness in the tart pan. Thoroughly drain pear slices and layer evenly over the cream until it’s completely covered. Brush with melted butter and sprinkle with sugar. Bake until golden brown and lightly caramelized, about 50 minutes.

Tart Pastry

2 cups baking mix – I use King Arthur gluten-free flour substitute

6 Tbsp butter

1 c confectioners’ sugar

1 egg

¼ tsp salt*

  • Cream butter and sugar; add egg and salt. Cut in flour. Form into ball, wrap and chill 2-3 hours. The dough will be quite sticky at first but will dry rapidly. If not avoiding gluten, substitute an equal amount of all-purpose flour for the baking mix.

Gluten-Free Pastry Cream

2 cups whole milk

3 tablespoons cornstarch

1/4 teaspoon kosher or fine sea salt*

2 tablespoons cold, unsalted butter

6 large egg yolks, at room temperature

1 tablespoon pure vanilla extract

1/2 cup sugar

  • In a large saucepan, bring the milk and salt to a boil, take off the heat, and set aside.
  • Beat the egg yolks and sugar at medium-high speed until the mixture is thick and light yellow, about 3 minutes. Turn the speed to low, and beat in the cornstarch. Then slowly pour the hot milk into the egg mixture and beat until well mixed. Pour the mixture back into the saucepan.
  • Cook the mixture over medium heat, stirring constantly with a whisk or wooden spoon until the mixture becomes thick and starts to gently boil. Continue to cook for 1 to 2 minutes more. Remove from heat and stir in the cold butter and vanilla. If the mixture appears curdled, keep whisking and it will come together again. Strain the mixture through a fine sieve into a bowl. Cover with a piece of plastic wrap, pressed directly on top of the pastry cream to prevent a skin from forming. Refrigerate until cold, about 2 hours. Makes enough for two tarts.
  • The pastry cream can be made 2 to 3 days ahead and stored in the refrigerator. Whisk the pastry cream until smooth before using.

*I use salted butter in both recipes, and omit the added salt.